With Media Management, admins can provide media galleries with Hotspots, press updates, videos, and asset zip files for your users to download. This is a great feature for providing lookbooks and catalogs to your buyers, as well as hi-res imagery packs or product knowledge kits.
Media overview
Your Media page is a place for you to provide creative imagery or other branding content in the tabs: Gallery, Press, Video, and Assets.
- Gallery: Galleries are a perfect place to showcase campaigns, brand DNA, or other marketing content. You can include Hotspots, so buyers can immediately add products to their cart.
- Press: Use this section to highlight press clippings, celebrity sightings, events, editorial features, write-ups, and any other newsworthy content. You can also include a caption, date, and link to the original posting.
- Video: Upload videos showing your collection, brand, storefront, or other areas in action.
- Assets: Offer zip files containing content that buyers can download, such as lookbooks.
Note: If you haven't added content for a section, it won't appear as a tab in the Media page. For example, the below image doesn't include Press content.

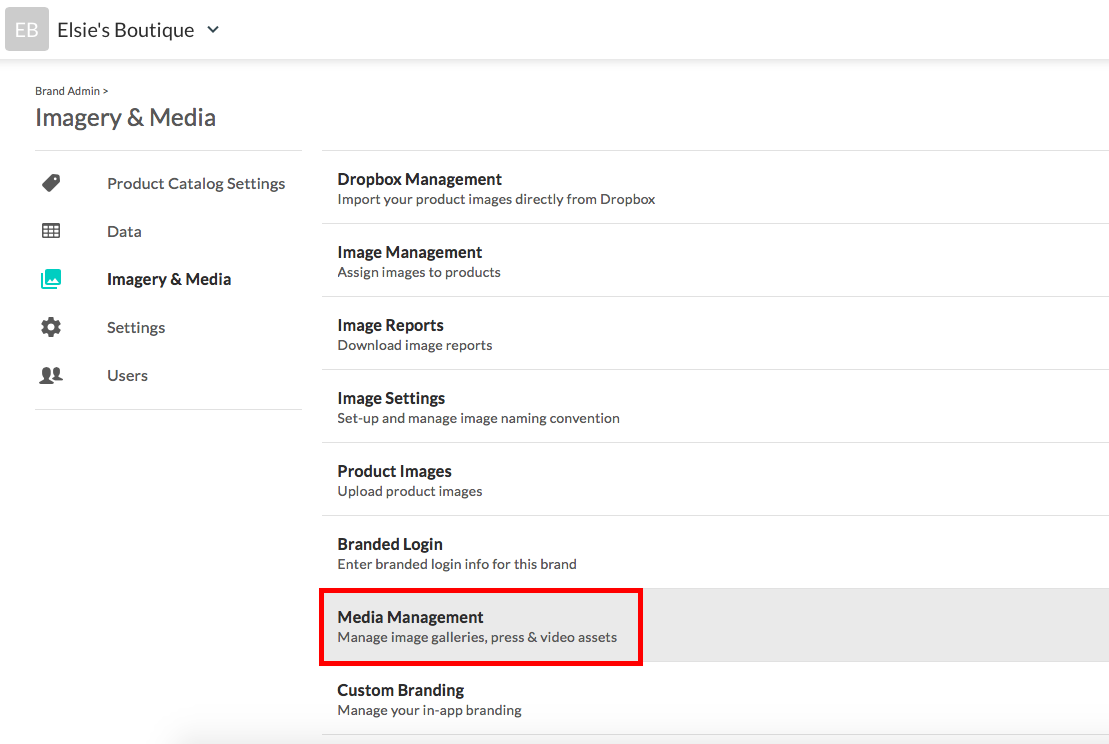
To add or edit media, go to Settings > Brand Admin > Imagery & Media > Media Management.

Select a tab (Gallery, Press, Video, and Assets) to edit or add content.

When uploading files for your Media page, follow these requirements:
| Images | Videos | Zip file |
|---|---|---|
|
|
|
Gallery
From the Gallery tab, select Add New Campaign Gallery (to create a new one) or the pencil icon next to Images & Descriptions (to edit one).

For each Gallery, include a Name, Description, set it to Active (when you're ready to launch), drag and drop images, and Save (or Update if editing).
Tip: Drag and drop images to reorder them.

In your Gallery albums, you can tag each image with Hotspots that correspond to active products. From the Gallery tab, select Hotspots for that album.

In the Edit Hotspots screen, search for a product, select Add Hotspot, and then use your mouse to click where you'd like to place the Hotspot in the image. You can add more than one Hotspot to each image. When you're done, select Save All Hotspots.

Select a Hotspot from the Edit Hotspots screen to Move or Remove it.

To access Hotspots, users can go to the Media page and select the + icon within an image to View Detail or Add to Order.

Press
From the Press tab, select Add New Press Gallery. Include a Name for the press album, as well as a Caption, Date, and Link for the image, which you can drag and drop. Set the Press Album to Active in the upper-right corner (when you're ready to launch) and Save (or Update if editing).

Video
From the Video tab, select Add New Video. Include a Video Title, set it to Active (when you're ready to launch) and drag and drop the video file.

Assets
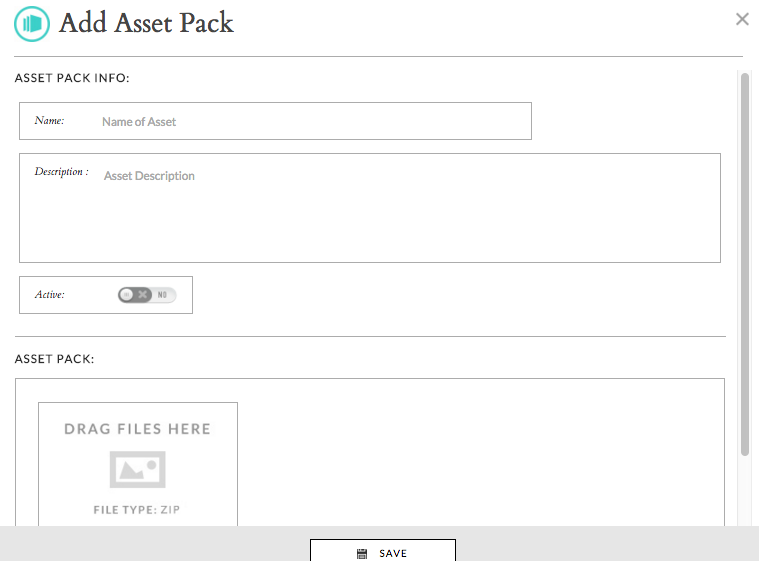
From the Assets tab, select Add New Asset. Assets must be added in a zip file format and no larger than 60 MB per section. Include a Name and a Description, drag and drop the zip file, and then set it to Active (when you're ready to launch) and Save.
Note: All users (internal + customers) can view and download assets.
